Wednesday, December 30, 2009

Swedish for a Day

My family isn't Swedish (just Norwegian, German, and most of the rest of Northern Europe) at all, but you'd never know it from our holiday menu. Every Christmas Eve we have Swedish meatballs and Swedish sausage to go with our lefse and pickled herring, and this Christmas Day I made kanebullar, Swedish cinnamon rolls, to go with our traditional present-opening feast of a breakfast.

The kanebullar were mostly for my sister Kathleen, who studied abroad in Stockholm and occasionally has pangs of Scandinavian homesickness that require a trip to the closest IKEA cafeteria. She swears the cinnamon rolls there are the best you've ever tasted.
I decided that one of my presents for her would be to try and recreate these miraculous Swedish rolls in the comfort of our own home. My ally in this attempt was Beatrice Ojakangas, a widely published cookbook author (and Minnesotan!) whose book Scandinavian Home Baking seems to be the definitive English work on the subject.


The recipe was surprisingly simple- a yeasted dough enriched with eggs and melted butter rests overnight (growing enormously in the process), and can be made into rolls the next morning. There is no kneading required, and the process of rolling out and shaping the rolls can be done quite quickly if you have all your ingredients assembled. The recipe makes about 32 rolls, more than you might want in one sitting, so I recommend assembling all the rolls and then freezing whatever portion you aren't planning to bake and eat right away. Yeasted enriched dough should hold up well for at least several weeks, and can either be defrosted first or baked straight from its frozen state.

One word of caution on the rising process - make sure that your dough is rising in a space that is an appropriate temperature. On Christmas I was able to leave the dough in the garage overnight, but by New Year's it had gotten so cold that the dough froze before it rose all the way - I probably should have made space for it in the refrigerator. The dough recovered a little bit the next morning, but never got quite as light and fluffy as the Christmas version.


Ojakangas suggests a cornet shape, looking like a croissant, for these rolls, but Kathleen assured me that real Swedes serve cinnamon rolls in the traditional spiral shape. I split the difference by making about half of each shape once the dough had risen in the morning. The risen dough is rolled out, slathered with a really delicious butter/cinnamon sugar mixture, and cut into the appropriate shape.


We enjoyed these Christmas morning along with our presents, and they were as appreciated as the gifts under the tree. Though delicious enough to make any morning feel like a special holiday, they were so simple and quick that I'd make them on an ordinary weekend.


Kanelbullar (adapted slightly from Beatrice Ojakangas' Great Scandinavian Baking Book)

for the dough
1 1/2 c. scalded milk
1/2 c. butter
3 eggs
1/2 c. sugar
1/2 tsp. kosher salt
1 pkg dry yeast (2 1/4 tsp.)
1/4 c. warm water (105 to 115 degrees Fahrenheit)
6 c. flour (I used 1/2 all-purpose and 1/2 whole wheat)

for the filling
1/2 c. butter, softened
1 c. sugar
1 tbsp. cinnamon

glaze
1 egg
2 tbsp. milk
pearl sugar or coarse sugar

To make the dough, bring the milk just to boiling in a small pot. Pour into a large bowl with the butter and stir until butter is melted. In a small bowl, dissolve yeast in warm water, let stand for 5 minutes. Mix eggs, sugar, and salt into the liquids in the large bowl. Add yeast once the mixture has cooled slightly. Mix in the flour to make a smooth but thick dough.

Cover the dough and refrigerate for 2 to 24 hours. The dough should rise substantially. When you are ready to make the rolls, prepare a clean, floured surface. Divide the dough into four parts, rolling each about 1/4 to 1/2 inch thick. Once the dough is rolled to the correct softness, brush with softened butter and sprinkle with the cinnamon and sugar mixture. To make a cornet shape, roll the dough into either a circle or a rectangle. Cut long skinny triangles/wedges, and roll from the base towards the point. Curl the ends together.

For a more traditional spiral shape, roll the dough into a long rectangle before applying the filling. Roll it up, then cut 1-2 inch slices. Lay on the flat side.

Once the rolls have been shaped, arrange them on a cookie sheet (greased or with parchment paper), and cover loosely with saran wrap. Let them rise for about 45 minutes or until slightly puffy. When ready to bake, preheat the oven to 375 degrees Fahrenheit. Mix the milk and egg for the glaze together, and brush on the rolls. Sprinkle the sugar on top. Bake for 13 to 15 minutes, or until golden. Enjoy!


Monday, December 7, 2009

it's freeeezing here


Ok, I know that as a native Minnesotan, I am not supposed to complain about the weather. But three years in Manhattan, where the combination of population density and pollution prevents snow from sticking for more than four hours, have left me totally soft and unprepared for the vicious reality that is Minnesota winter.

We're set to get our first big winter storm this week, and it's supposed to be 2 below on Friday. Not below freezing - below ZERO. So I'm planning on spending most of this week and weekend heating up in the kitchen, hanging out by the warm oven and getting a bunch of my holiday baking done.

On the agenda so far: family classic Russian Teacakes, Peanut Blossoms, Scandinavian spritz cookies, and a brand new chocolate gingerbread cookie recipe from the geniuses at Baked, one of my favorite bakeries of all time.

What are you making for the holidays? And what else should I make? If you've been good this year, I might take requests ;)

very American apple pie

If there's anything more American than apple pie, it's this apple pie, which has a delicious pecan crumble crust covering sweetly spicy apples that have been sauteed in real Kentucky bourbon. Pecans, being native to south-central America, put the patriotic appeal of this delicious dessert right over the top.

I first made this recipe for Thanksgiving dinner two years ago, after seeing it in the New York Times. It comes from a restaurant called Bubby's in Tribeca, a diner known for an delicious home-style brunch and an extensive, varied, and invariably scrumptious selection of pies. I loved the recipe so much that I ended up asking for the book it came from that Christmas, and everything I've made from it has been really, really good.

But back to the pie at hand. We usually have a pretty good-sized crowd for Thanksgiving dinner, and not everyone in my extended family likes pumpkin pie (sacrilege, right? you already know how I feel about pumpkin flavored things). I love making classic apple pies (in fact, I entered one in the Minnesota State Fair this summer), but I was intrigued by the addition of the bourbon, the nutty crumble topping, and the fact that the apples get sauteed before being put in the pie shell.

This pie is fantastic with or without classic accoutrements such as whipped cream or vanilla ice cream, and was such a big hit with my family that we haven't been able to celebrate Thanksgiving without it since. For some reason, this year's pie was even more delicious than last - I don't know if it was the Wild Turkey, the Minnesota-grown apples, or my culinary education kicking in, but I hope next year's turns out just as well!

Bubby's Whiskey Apple Crumble Pie (slightly modified by me)


Pate Sucree (recipe from the French Culinary Institute):

125 grams butter, softened

63 grams powdered sugar

1 egg plus one yolk

250 grams all-purpose flour


Crumble Topping:

3/4 c. all-purpose flour

1/4 c. light brown sugar

1/4 c. granulated sugar

1 tsp. cinnamon

Salt

6 tbsp cold unsalted butter

1/2 c. chopped pecans


Whiskey-Apple Filling

3 tbsp. cold unsalted butter

2 pounds tart apples, peeled, cored and sliced 1/4-inch thick (Granny Smith work great)

1/2 c. light brown sugar

Pinch ground cloves

Pinch ground nutmeg (freshly grated, if possible)

1 tsp. ground cinnamon

2 tbsp. whiskey or bourbon (I used Wild Turkey for an All-American Kentucky bourbon take)


1. To make the crust, bring the butter and the eggs to room temperature. Beat the butter and the (sifted) powdered sugar with an electric mixture until thoroughly creamed. Add eggs one at a time, careful to maintain the emulsion and mix thoroughly before adding the next. Add flour and mix only until incorporated. Wrap in plastic and chill in refrigerator for at least one hour.

2. Roll out crust, place in buttered 9-inch pie dish, crimp edges as desired. Chill for at least 30 minutes. (I like glass or Pyrex pie tins, because they allow me to monitor the done-ness of my crust more easily.)

3. Make the crumble topping, either by hand or in a food processor. If the latter, add all ingredients except butter and nuts, pulse to mix. Add butter, pulse until texture approximates lentils or small peas. Add chopped nuts. If by hand, mix all ingredients except butter and nuts until combined, cut in butter with pastry blender or two knives. Mix in pecans at end, chill until needed.

4. Core and slice apples (I tend not to peel mine, you can if you like). Melt butter in frying pan over medium heat, add apples and brown sugar. Cook until slightly soft around the edges, about 10 minutes. Remove from heat, add spices, bourbon. Let cool for 10 minutes

5. Pour filling into chilled crust, top with crumble. Bake at 400 degrees for 10 minutes; lower oven to 350 and bake for another 40 to 50 minutes, or until topping is set and filling is juicy, bubbling, and heavenly-smelling.

6. You'll want to eat it right away, but do yourself a favor and let it rest - the pie will cut more easily and taste even better once it's cooled down (at least an hour - our pie was even tastier the day after Thanksgiving!)

Monday, October 5, 2009

if Starbucks can do it...

I know that Thanksgiving is still six weeks away, meaning it's probably too early for the seasonal deluge of pumpkin-pie-spiced foods. But here in Minnesota it's COLD already, cold enough that I've been hunting for my box of winter clothes that got somehow misplaced in my move. Cold enough that I heard the "s-word" on a weather report yesterday. (snow? in October? we are not in Manhattan anymore...) And cold enough that I felt justified in needing to make these pumpkin muffins when I saw the recipe while flipping through my enormous cookbook collection. Plus, Starbucks is already hawking their pumpkin pie latte. If they can do it, so can I.

I made these muffins last Saturday night, to give me something to do other than watch bad TV and get nervous about our race the next day before I went to sleep early. (I just started coaching a juniors rowing team. They're the best, but I now have enormous compassion and sympathy for all the coaches I worked with growing up.) I've always found baking to be a productive form of stress reduction, and these muffins did their job.

These muffins have the dubious distinction of being "healthy," with whole wheat flour and a relatively limited amount of fat compared to many other muffin recipes. Unlike some lower-fat recipes, they were still nice and moist, and the molasses adds a distinctive fall flavor. The pungent combination of spices made the whole house smell good as the muffins baked, and the finished product was a big hit in the food tent at the regatta.

I adapted this recipe from Ellie Krieger's The Food You Crave, which seems to do a great job making healthy food taste like it might not be so healthy. The recipe as written calls for 1 c. of pumpkin, which is just slightly over half of the standard size 15 oz. can. I hated to see the extra pumpkin going unused, so I not-quite doubled it to use all the pumpkin, and adjusted for the fact that I was missing some of the suggested flavoring.

Pumpkin Pie Muffins

2 c. all purpose flour
1 3/4 c. whole-wheat flour or whole-grain pastry flour
2 tsp. baking soda
1 tsp. kosher salt
2 tsp. ground cinnamon
1 tsp. ground ginger
1/4 tsp. ground nutmeg
1/2 tsp. ground allspice
1 1/2 c. firmly packed dark brown sugar
6 tbsp. molasses (I used full flavor, and the finished product was VERY molasses-y, so I would adjust according to your taste)
1/2 c. vegetable oil
15 oz. canned pumpkin
2 tsp. vanilla extract
1 1/2 c. lowfat buttermilk

Preheat the oven to 400 degrees Fahrenheit. Butter or spray 24 standard size muffins, or twice as many mini-muffins.
Whisk the flour, baking soda, salt and spices together in a medium sized bowl. In a larger bowl, combine the brown sugar, molasses, and oil, whisking until smooth. Add the eggs one at a time. Whisk in the pumpkin and vanilla. Stir in a third of the dry mixture, then half the buttermilk. Repeat, ending with the last third of the dry ingredients, being careful not to overmix. Pour into prepared muffin pans, and bake for approximately 20 minutes or until the top springs back to the touch (mini muffins will bake more quickly). Let cool, unmold, and store in airtight container. I imagine these would freeze well, however none of ours lasted long enough to find out!

cookies (according to me)

My family does care packages better than any other family I know. My freshman year of college, I was the only kid on my hall who received a customized copy of "The National Enquirer" with her pet's face posted over the "World's Fattest Cat!!!" picture. Another only-in-my-family winner was the CD labeled "We Love You, Liz" that contained only 17 tracks of my least favorite song. With no set list, so I had to listen to every track to find out exactly what was on it. (The song, in case you were wondering, is "Teen Angel." So tragically stupid.)

But the best care packages always involved food. I have a very clear memory of getting a large container of my mom's chocolate oatmeal cookies sophomore year, and sharing them with hall-mates only to become mired in a deep philosophical debate - were these cookies actually cookies? Some stubborn friends insisted that to be a cookie required spending time in an oven, making these no-bake goodies unworthy of the cookie title. But there's chocolate, and sugar, and butter, which makes them a cookie in my book.


Now that I have a classical pastry education, I feel free to unilaterally declare that these morsels of fudgy goodness, are in fact cookies. But whatever you call them, they're delicious - a winning combination of chocolate and peanut butter combined with the chunky solidity of oatmeal. They're also quick and easy to prepare, and require only one pot and one spoon. It's true that beauty is not among their many attributes, but I think once you taste them you won't mind one bit.


This latest batch is destined for a care package to my sister Kathleen at graduate school, but of course I saved a few for us here!

Chocolate Oatmeal Drop Cookies

3 c. sugar
3/4 c. cocoa
1 c. milk
1/2 c. butter
1 c. peanut butter
1/2 tsp. salt
2 tsp. vanilla
6 c. quick oatmeal

Bring the sugar, cocoa, milk, and butter to a rolling boil for one minute over medium to medium high heat. Remove from heat.
Add vanilla, peanut butter, and salt, stir still smooth.
Add oatmeal, stir to coat.
Drop with tablespoons onto waxed or parchment paper. Let cool.
Enjoy!

I'm baaack

Sorry it took so long! Hopefully these new posts and recipes will help make up for my absence, and I'll try to be more diligent in the future...

Saturday, July 18, 2009

vegetable adventures, part 1


As I mentioned earlier, my family is participating in a CSA with a local farm, and so far it's been an interesting and delicious experience. The first week we got lots of fresh lettuce, some herbs, the greenest pea pods I've ever seen, and one pint of delicate, beautiful early strawberries, which I turned into a strawberry tart for Kathleen.


Since then we've gotten at least two pints of strawberries every week, and more lettuce. Beets, radishes, zucchini, sweet little pickling cucumbers, and fresh currants (both red and white) have all come through our kitchen. And then last week we got our first UVO - unidentified vegetable object. Spiky and maleficent looking, it wasn't really like anything I'd seen before. My mom stripped its green crown so it would fit in our crisper drawer, where it sat for several days before an illuminating newsletter arrived from the CSA with the weekly list of box contents. By process of elimination (not lettuce, not beets, not strawberries), I deduced that I was facing a kohlrabi.

I should have known to keep a weather eye out for this strange vegetable; a friend who'd participated in a CSA previously had warned me about them. "I didn't know what to do with it," she said, "so it just sat in our refrigerator all summer and eventually I threw it away." Being a child of the Internet generation, I turned to Google for answers. Wikipedia and the University of Minnesota website informed me that kohlrabi is part of the cabbage family, and can be eaten raw or served baked, roasted or steamed. Taking a cue from Deborah Madison's book Vegetarian Cooking for Everyone, which I checked out of the library and have been loving, I decided to steam it and serve it with sour cream and dill, potato-like.


Ten minutes and a sharp chef's knife transformed the kohlrabi from something alien to something ordinary, just a pile of small white matchsticks. My youngest sister, whose general disdain for all things vegetable has been observed in this blog before, wandered by and tried a few of the raw pieces. "This is good," she said, surprising both of us. "It tastes like cauliflower."


Which it does, vaguely, being clean and starchy with just a bit of a peppery finish. In a midstream change of tactics, and in deference to the fact that cauliflower is one of two vegetables Laura actually likes, we decided to roll with the kohlrabi's cauliflower-like properties and prepare it the way we like our cauliflower - tossed with a little bit of olive oil, kosher salted, and roasted in a 400 degree oven. Since the vegetable had already been cut into matchsticks, we ended up with a dish that resembled kohlrabi fries - salty, crispy, a little burned, and really not half bad. So our first vegetable adventure ended very well, and I'm looking forward to whatever next week's basket brings us.


take out the trash fruit crisp

Shortly before I left New York, I was thrilled to discover that Bravo showed reruns of The West Wing almost every day. I bribed myself to pack and clean between 9 and 11 each day with those two hours of political skullduggery and smart, witty rapid-fire dialogue (and Rob Lowe as Sam Seaborne). The show is crammed with throwaway lines and funny little conceits, one of my favorite being "Take Out the Trash Day" from the first season. The White House deliberately releases several sensitive and potentially damaging stories on the same day, realizing that with a finite amount of column space each issue will receive less press. This concept, slightly transmuted and with a positive spin, is just as applicable in a summer produce-filled refrigerator, and the results are much tastier!

Now, I'm not suggesting you use any fruit that actually belongs in a trash can. But if you find yourself facing, as I did recently, half a case of cherries going slightly soft, a few nectarines whose better days have passed, and the remains of a pint of strawberries, do not despair. An oatmeal-topped crisp is the perfect solution when you don't have quite enough of anything to make a fruit-specific dish and the fruit in question is no longer pretty enough to be served raw or on its own.

Exact technique or recipe will vary depending on the fruit you use, but most fruit can be cleaned, sliced, tossed with a little bit of sugar, lemon juice and spices to taste, spread in a glass or metal baking dish and sprinkled with generous handfuls of an oatmeal/butter/brown sugar topping. I like to add a little kosher salt and cinnamon to round out the flavor; fresh nutmeg or ginger can also be delicious. Bake the crisp in a 350 degree oven for 30-45 minutes, or until the fruit starts to juice and bubble and the topping becomes golden and crisp.

If you want to use a harder fruit like rhubarb, I recommend sauteeing or poaching it before placing it in the dish. Rhubarb is delicious cooked on the stovetop with butter, a scraped vanilla bean, sugar, and a little rose wine. Sliced strawberries can be added after the rhubarb is cooked and before placing the crisp in the oven for a deliciously seasonal take on early summer ingredients.

One of the best things about this fruit crisp is its versatility - it will be perfect with strawberries and rhubarb in June, raspberries and peaches in August, and apples and cinnamon through the fall and winter.

Thursday, June 18, 2009

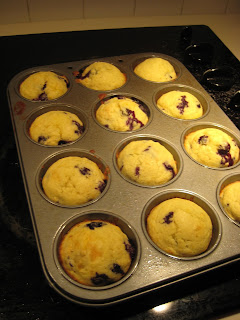
birthday blueberry muffins


My sister Kathleen turned one year older last week. Birthdays are a pretty big deal in our family, especially Kathleen's birthday - she's always claimed it's her favorite holiday, and once we celebrated for a week. I offered to use my new pastry super-skills to make her a birthday cake, but was rejected in favor of a Sebastian Joe's Oreo ice cream pie. There were no hard feelings about this, since I'd rather eat Sebastian Joe's ice cream than pretty much anything else on earth, especially on a lovely June day.

I did want to contribute something to Kathleen's birthday though, so I offered to make blueberry muffins for breakfast. We had a giant Costco-size container of blueberries in the fridge (one of the many wonders of being back in suburbia) so I lacked only a recipe. With my cookbooks all still packed away in the cardboard boxes I'd shipped from New York, I turned to my mom's copy of The Joy of Cooking. It's missing the front and back covers and the first few pages, so I can't tell you when it was published, but it certainly looks like it's been well-loved since then.

There are several muffin "base" options in The Joy of Cooking, including bran and sour cream. I decided to stick with the recipe called simply "Muffins", varying as suggested for blueberries and adding some orange zest. They turned out beautifully, the perfect start to a birthday, or any day.
Birthday Blueberry Muffins, adapted from The Joy of Cooking by Irma Rombauer and Marion Rombauer Becker

Preheat oven to 400 degrees Fahrenheit

Ingredients:
2 c. sifted cake flour
3/4 tsp. salt
1/3 c. sugar
2 tsp. baking powder
2 eggs
1/4 c. butter, melted and slightly cooled
3/4 c. milk
1 1/2 c. blueberries, fresh or frozen
1 tsp. grated orange zest

Combine all dry ingredients. In a separate bowl, whisk eggs, melted butter, and milk. Make a well in the dry ingredients, pour in wet ingredients and stir just until combined - it's ok if the batter is still lumpy, and you don't want to overmix. Add zest and blueberries, and pour into prepared muffin tin. Bake until golden brown on top - approximately 18-20 minutes.

(Note: while the original recipe suggests that this makes 2 dozen muffins, I found that it makes 12 standard sized muffins. Muffins must have gotten a lot bigger since this book came out!)


Sunday, June 14, 2009

goodbye New York, hello Minnesota

At some point in the last month - actually, at many points - I intended to update this blog with some big, exciting news, and offer some hopefully profound thoughts on What It All Meant and what I'm going to do with my life now that I officially have a certificate (with honors, no less) in Classic Pastry Arts.  But that obviously didn't happen, and so here I am writing to you with the Big Event - my move from Manhattan to Minnesota - having already come and gone about as well as a cross-country move from a studio apartment into my high school bedroom could possibly be expected to go.  (Read: there are still multiple boxes of homeless books and kitchen appliances lying around).

My last weeks in New York were a blur of friends visiting, dinner parties, and sentimental "lasts," interspersed with my daily chores of begging boxes off the friendly guys at my local liquor store, packing as much in them as possible and then walking to the Post Office and back often enough that the panhandlers and United Way employees along my route stopped asking me for money.  There were moments of excitement - my first trip to the Metropolitan Opera House - and moments of sadness - our last Sunday Supper Club and my last night out with former Lehman colleagues.  (well, considering how many of those nights ended, maybe that one's not so sad!)

And of course there was great food along the way.  My sister graduated from college and one of my best friends turned 25, both events requiring special homemade cakes.  I made the best slice and bake cookies ever, tried my ice cream maker for the first time with some interesting results, and punched up this summer's first batch of my favorite sangria with tangy sliced rhubarb.  All adventures I hope to share with you.

I'm also looking forward to cooking (and writing about) all the great local produce here - Minnesota in the summer offers some of the best eating opportunities around.  My family signed up for a share in a CSA (Community Supported Agriculture) this summer, so every week we'll be getting a delivery of produce from a local farm.  My goal is to create dishes from this food that even my vegetable-hating youngest sister, who could eat medium-rare steak or or Chinese takeout every night, will like.  Our first shipment arrives next Monday - we're expecting strawberries and some cole crops (broccoli, cabbage, bok choy, etc) in the first weeks, so I've been perusing recipe books to prepare.  I'm thinking the strawberries would be perfect with some of the rhubarb that's growing in the garden at our cabin.  

Taking advantage of trading my studio apartment for a house with a yard, I've also planted some herbs in our garden, hoping to have fresh basil for pesto, and fresh mint for the mojitos my dad makes so well.  My thumbs have always been more black than green, so we'll see how this experiment goes - hopefully I'll have some good garden pictures for you soon.  I'll leave you with the number one reason I'm happy to be back in Minnesota for the summer, my favorite (and in my biased opinion, the best) place on Earth.  I hope you all are enjoying a relaxing summer evening somewhere just as special.

Thursday, May 7, 2009

The Big Finale

I think I've been putting off a post about my final exam because once it's up, I'll have to accept that school is really, truly, over and done with. I'm within eyesight of my fancy little Pastry Arts Certificate right now, but it still hasn't quite sunk in.

The Final Exam (and yes, it deserves those capital letters) encompassed the last four days of our coursework. In these four days, we had to produce four items chosen in a random lottery and a showpiece to put them on. Every student's list was different, but each included one chocolate item, one cake or tart, one petit four, and one viennoiserie/bread item. The theme for our class chose for the showpiece was "My Favorite Place," and it had to include stands for three of our items. The showpieces were limited in footprint, but could be as tall as we liked.

The final exam lottery was a nerve-wracking experience - each student drew a piece of paper out of a Kitchen Aid bowl with four items, one from each category. All the items were taken from lessons in Level 1, 2, or 3, so nothing was brand new, but some assignments definitely sounded more fun than others. I drew a fresh fruit bar tart, made with creme legere and puff pastry, fruit danish, langues des chats (little "cats' tongues" petit four cookies), and caramel ganache bon-bons. I like making laminated doughs, so I was excited about the puff pastry and the danish.
Once we had our assignments, the next task was coming up with a beautiful showpiece to hold these items. My design was inspired by our cabin on North Long Lake, Minnesota and composed primarily of poured sugar, nougatine, and pastillage sugar paste. I wanted my stands to be composed of elements central to the cabin experience - a nougatine "dock" for the fruit tart, a pastillage "firewood stand" for my petit four cookies, and a gum paste "hammock" for my chocolate bon bons. I also planned a cute little pulled sugar bonfire with nougatine "logs" and a chocolate "tent" memorializing the nights we slept outside while the cabin was under construction. The backdrop, more poured sugar, would have pastillage northern pines silhouetted against an airbrushed sunset.
Four days may sound like a lot, but the wedding cake experience showed us just how fast time could fly when working on these projects. So again, a tightly plotted itinerary was mandatory for success. I planned to finish many of my showpiece elements in the first few days, leaving the doughs and items that needed to be baked freshly for the end of the timeline. All in all, the schedule held up relatively well. Sticky, humid weather threw a small wrench in my plans, forcing me to repour my "lakeshore" base at the end of the second day, but excitement over my surprisingly realistic gum-paste "hammock" made up for it.

One of the most exciting and stressful things about the final exam at the FCI is that your judges are not the chef-instructors who have been teaching and guiding you for the last six months. They are industry professionals - in our case, successful pastry chefs - who will be judging the projects and products on real world standards. Our assignment for Day 4 was to move our showpieces down the hall to the judging room, and prepare a tasting plate for the judges with each item that we prepared.

The last two days were busy, but I managed to finish my food and my showpiece just before the noon deadline. The walk from the kitchen down the hall to the judging room was maybe 20 yards, but it felt much, much longer. Setting my showpiece into its numbered slot, I breathed a sigh of relief. Too soon, as it turned out. Less than a minute later, while trying to remove the wooden board that we had used to transport it, the backdrop of my sugar showpiece fell forward into the rest of the stand, smashing my hammock to smithereens and breaking my beautiful airbrushed sunset backdrop into pieces.

I was so shocked I couldn't move for a minute. But my classmates and chefs rallied around me to glue the pieces back together as best we could - the hammock was toast, but classmates donated spare pieces of pastillage and sugar, making it possible for me to assemble a last-minute third stand. Without their help, it wouldn't have come back together. The only thing I really regret is that I didn't get a picture of the finished product before the accident - so here's the picture I have for you. It's a bit Picasso in his Cubism phase-esque due to the fractured pieces, but hopefully it gives you a sense of what I was going for.

The whole afternoon is a little fuzzy, but I do remember asking my chef, "I'm not going to fail, am I?" I was very relieved when the answer was no. Having passed the final exam, the only thing left to do was breathe a deep sigh of relief, and prepare for graduation the next day.

Sunday, April 26, 2009

field trip: momofuku milk bar

David Chang (FCI '01) and his ever-growing Momofuku empire have been an inescapably omnipresent force in Manhattan dining over the last few years, the most recent honor being Momofuku Ko's Best New Restaurant win at the James Beard Awards earlier this week. As a pastry chef, I was intrigued by Momofuku Milk Bar, the latest empire outpost, and when the FCI offered a student outing to the bakery I signed up right away.

From the street, the Milk Bar is an unassuming East Village glass storefront, close enough to the other Momofukus that customers will come over and have a drink while waiting for a table in the evenings. Inside, the space is dominated by two long wooden table/counters that customers stand at, two big black chalkboards with the current menu, and a glass case displaying the day's wares.


No sooner had we gathered around around one of the long counters than a cheerful employee brought trays of goodies out for us to try. We started with an assortment of cookies - blueberry cream cheese, banana bread, double chocolate, cornflake, and my favorite - the compost cookie. All the cookies were great - crispy on the outside, soft and fudgy on the inside - but the combination of sweet and salty in the compost cookie really hit the spot. It isn't literally composed of compost, of course, but it does boast an interesting assortment of savory surprises - potato chips, bread crumbs, pretzels - check out the cross-section below!


From cookies we moved on to cakes - chocolate chip with passion curd, dulce de leche, and a fantastic banana cake with gianduja filling and pieces of crispy feuilletine. The Milk Bar also sells an ever-rotating array of soft-serve ice cream; the four flavors we had were all based on types of donuts: jelly, old fashioned, chocolate, and bavarian cream. All the ice creams, with the disappointing exception of the chocolate, were very good, and tasted a startling amount like their inspirations.

Next were the pies - candy bar pie, cinnamon bun pie, and the dish that has already become a Momofuku signature, crack pie. Personally, I found the crack pie to be terribly overrated and not nearly as addictive as its namesake. It is very sweet and very gooey, but not very interesting. It reminded me a little of the St. Louis treat "ooey gooeys" that our crew captain in college made for team snacks, but not nearly as good.

The cinnamon bun pie, on the other hand, was surprisingly fantastic. I'm often not a big fan of commercial cinnamon buns - they're too heavy, too dry, too greasy, or not worth the astronomic calorie count. The Momofuku version has none of these flaws. Head pastry chef Christina Tosi brought a plate out to our group and explained the dish's genesis. When the Milk Bar first opened, they were serving individual cinnamon buns, but the super-popular dish was very labor-intensive and time consuming.

Transforming the bun into pie form made it easier to assemble, store, proof, and bake, without losing any deliciousness in translation. A slightly sweet bread dough forms the base of the pie, and is layered with whipped brown butter, the Milk Bar's liquid cheesecake, and cinnamon sugar (x2), then topped off with an oat streusel. Served warm from the oven, the "crust" is light and flaky, the filling oozes just enough, and the streusel provides the perfect crunchy counterpoint. Hands down the best thing I ate all afternoon.


Our Milk Bar journey took a detour to the savory side towards the end of our trip, with banana green curry bread and the Milk Bar's own kimchee and black pepper butter. The curry in the bread was hardly noticeable, but it had a beautiful moist texture and a slightly sweet banana flavor that was a nice foil for the intense savory punch of the butters. The kimchee butter reminded me more of smoky bbq chips than spicy cabbage, but was delicious all the same, while the black pepper butter had a Mediterranean tang of olive oil and parmesan.

Throughout the visit, I was trying to decide how to categorize or sum up the Milk Bar's offerings, other than delicious. Surprising, inventive - but not really, since most of the items were using flavors or flavor combinations that were established favorites. Where the Milk Bar seems to shine is taking those classics and reinventing them in other media - ice cream out of donut flavors, a blueberry-cream cheese cookie taking inspiration from a blueberry muffin top, candy-bar and cinnamon bun pies, cookies with pretzels. Your favorite flavors, made new again.

Our final dish at the Milk Bar was another signature and a popular breakfast item - the Momofuku pork bun with a deep-fried poached egg and pickled cucumbers. As I've already mentioned on this blog, I have a soft spot in my heart for some deep-fried things. While I don't think I'll be trying this one at home anytime soon, it was quite delicious, and a perfect way to end the visit (and stave off a serious sugar crash on the walk home).

Tuesday, April 21, 2009

Saucepan Brownies


This, my friends, is a truly rare piece of paper. Battered and butter-stained it may be, but its scarcity value is almost incalculable. This practically one of a kind item is a recipe in my father's handwriting. Don't get me wrong, my dad is a really good cook when he chooses to be - he makes the best pancakes ever, and can cook pretty much anything on a grill. But he's never been a baking or recipe-book kind of guy. This recipe's provenance, then, is something special.


It originated, not with my father, but with my maternal grandmother. One of my mom's favorites when she was a kid, it was a recipe she would call home for once she had a kitchen of her own. One day over 25 years ago, my mom and her then-boyfriend drove down to my mom's hometown on a quest for all of her favorite childhood recipes. My grandma pulled out cookbooks and binders filled with handwritten notes, and my dad was set to work copying old recipes onto notecards in his distinctive lawyer's scribble.

I remember my mom making these brownies occasionally when I was younger, but I hadn't thought about them in ages. A fortuitous lack of groceries brought them back to my attention when I was home in the Twin Cities for a few days last week. My youngest sister is as ardent a chocoholic and as willing a taste-tester as a pastry chef could hope to find. So when I proposed making brownies after dinner one night she was flatteringly enthusiastic, and I set to work. I planned to use a brownie recipe I'd made and liked before, which called for both bittersweet chocolate and unsweetened cocoa powder and took about an hour to bake.

Alas, nowhere in our vast suburban cupboards was any cocoa powder to be found, and my lazy New Yorker self couldn't stomach the thought of having to get in a car and drive somewhere to procure some. While my dad was suggesting replacing the cocoa powder with anything chocolate he saw (hot cocoa mix, Toll House chocolate chips, Hershey's syrup), my mom pulled this recipe from an old brown binder.

As I soon discovered, this recipe alone was well worth the drive my parents took so long ago. It's simple (7 ingredients, which are probably in your kitchen right now), fast (35 minutes start to finish), and incredibly delicious. Straightforward and intensely chocolate-y, this is the archetype of the classic American brownie. Walnuts are optional - my family's split half and half on the issue, and so is the batch I made at home.


Here's the recipe as my dad copied it out, with my notes below.


2 squares chocolate = 2 oz. The original recipe calls for unsweetened chocolate; I was going with what we had at home so I used some unsweetened and some of a nice bittersweet Scharffen Berger that was left in our cupboard from my last visit home, so I decreased the sugar a little.
1/2 stick butter = 1/4 c. or 4 tbsp.
6x10 inch pans aren't quite as common as they used to be; I used an 8x8 inch glass pan and it worked out nicely
I didn't frost the brownies, but I'm sure that would be good too

Tuesday, April 14, 2009

coda


Our last month of class was stuffed with projects and exams, not least of which was the "menu project." Such a simple name for such a complex beast! It is not, as the name might suggest, merely a menu. It is actually the creation of an entire restaurant and rationale, a black hole-like project capable of absorbing every ounce of energy and ambition a pastry student can muster. I wasn't the only student in my class to lie awake at night thinking about plating designs or foist trial runs of prospective desserts on friends and relatives.

The focus of my labor, my own greedy little black hole, was called Coda. A dessert and wine bar near Lincoln Center, it would feature classical French desserts influenced by the cosmopolitan atmosphere of New York City and the Lincoln Center neighborhood. I envisioned it as the ideal place for a pre- or post-show gathering, with a contemporary, candlelit ambience equally suited to convivial conversation with friends or an intimate first date.

To transform an idea into a fully realized business plan, the project is divided into several components: a printed menu, a business fact sheet, plating diagrams for all the desserts on the menu, a class presentation/pitch, and a practical exam. The menu itself was fun to make and shop for - it gave me an excuse to spend quality time and actually buy something in the tony stationery store Kate's Paperie, usually one of my favorite places to window shop.


I knew I wanted a neutral, sophisticated look to match the clean Scandinavian lines of my virtual decor. I was almost paralyzed by the number of shades offered between white and yellow, but when I tried an ivory paper with a slight rib against a dark chocolate cardstock, I knew I had found my menu. I think it was the hint of shimmer in the cardstock that finally sold me - perfect for candlelight!


Once the written part of the project was finished, it was all about the food. For the practical exam, our chef chose two desserts from each student's menu. The desserts were to be plated and served a la minute at an assigned time, as if they had been ordered in the restaurant. To give you an idea of how the project looked on paper, here are my plating diagrams for the two desserts I prepared for the practical: Pain Perdu and the Metropolitan Opera Cake.


We had two days total for the practical exam: one to mis en place (prepare) the components of our desserts, and one for final touches and plating. As with the wedding cake project, a well-planned itinerary was crucial for success. Since both my desserts included ice cream and components that needed to be baked, I spent most of the first day making and spinning ice cream, baking chocolate and hazelnut cake, and shaping and baking the brioche for my pain perdu. I also candied my hazelnuts, made chocolate sauce, prepared hazelnut cream, and assembled my Opera cake. Whew!

Day 2 was even busier: I made custard for the pain perdu, baked it off, glazed and cut my Opera cake, and successfully flambeed my fruit compote without lighting myself on fire. As my assigned time for plating drew near, I gathered my components. Clean, logical station organization is crucial for successful plated desserts - the chef needs to be able to find everything she needs quickly and not get in her own way. Timing is critical when working with desserts that involve hot or frozen components, and I had both on my plates. The pain perdu needed to be fried right before plating, because no one likes lukewarm French toast, and the ice cream had to be scooped at the last minute so it wouldn't be a sloshy puddle when I got to the chef's station for judging.


My itinerary worked out well, despite a last minute fear that my pain perdu had gotten cold which spurred me to fry two more pieces for grading in the last 90 seconds before my assigned time. All the components made it on the plate, and the desserts basically resembled their paper templates. I was especially excited about my Metropolitan Opera Cake, my version of the French classic, which was named after the Opera Garnier in Paris. The original features hazelnut cake with coffee buttercream, chocolate ganache, and chocolate glaze; mine was composed of chocolate and hazelnut cake layers soaked with a potent espresso-whiskey syrup, filled with a rich hazelnut cream, and topped with a chocolate glaze. Coffee ice cream, chocolate sauce, and candied hazelnuts were served on the side. Yum. I unfortunately didn't get a picture of my desserts until after the ice cream melted, but imagine a cute little scoop of ice cream instead of a puddle, and you've got the idea.


The pain perdu was an interesting challenge for me because it's basically French French toast. And I hate French toast. So my goal was to come up with a recipe that even people who don't like French toast would like. Rather than soaking bread in a custard and frying it off immediately, I decided to try baking the bread in the custard first, then frying it at the last minute. I hoped that this would give the pain a nice crisp crust, while keeping the inside soft and creamy. Luckily for me, I have friends who like French toast and were willing to be guinea pigs - a big thank you to Brian, Ainsley, and Catherine, who sacrificed a Sunday evening to come over and eat lots of dessert!

The experimental technique was a definite success - baking the custard in a low oven kept it sweet and creamy, and it didn't develop the overdone, eggy flavor that normally turns me off French toast. My tasters approved, and I even ate a whole piece myself. I used homemade brioche, but for all you French toast lovers, this technique would also be great with challah or another enriched bread with a texture and crumb hearty enough to stand up to being soaked and baked in custard. Here's what the final product looked like (served with flambeed fruit compote, a whipped cream rosette and a puddle of formerly pretty maple ice cream).


It consumed several weeks of my life, robbed me of many hours of sleep, and gave me a few new grey hairs, but I ended up loving my menu project. I was very sorry to say goodbye to Coda when the last dessert had been graded. So if anyone out there has start-up capital lying around and wants to fund a dessert and wine bar near Lincoln Center, you know where to reach me...


Thursday, April 9, 2009

something tiered, something blue

The wedding cake project is one of the culminating events of the pastry arts curriculum. It begins as a cooperative effort between Levels 2 and 3, as the Level 2 students act as the "clients" for the project. They assemble a full portfolio to guide the Level 3 students making the cakes, choosing a bride and groom, a location and theme for the wedding, colors, flowers and even a first song and a dinner menu for the reception.
My class had previously been on this creative end of the project, nominating Prince Harry and the heiress to the F.A.O Schwarz fortune (who happens to be Glenn Close's daughter) for a winter wonderland wedding at a castle in Scotland. I helped design and word the royal invitation, and wrote a backstory for the couple in the manner of a "Vows" column in the New York Times, complete with cheesy (but perfect) closing quote. Being on the receiving end of this torrent of information, then trying to decide how to turn a pile of facts, locations, and colors into a cake that embodies the essence of a couple, I found much harder.

Our happy couple was a pair of Americans heading to a destination wedding in Barcelona. She was a teacher, he was an attorney. They met in Spanish class at Harvard, and chose blue as the color for their casual ceremony. Flowers were bluebells and frangipani, the china had hints of blue, and the bridesmaids wore another shade of blue altogether.

Never having been married or looked at wedding cakes much myself, I wasn't sure where to start. The only wedding cake I was acquainted with was my parents', which in the simple spirit of their wedding was a single layer of cake covered with chocolate frosting. My mother has been heard to compare it to a muddy football field, but apparently it tasted delicious. However, since our cake for class was required to be three tiers tall, I would have to search for inspiration elsewhere.

I found it in the delicate, elaborate scrolls on the invitation. My vision was of a simple, graphic design in white sugarpaste on a background of blue rolled fondant, the bright colors echoing the Spanish location and casual, joyful nature of the ceremony. The topper would be a simple monogram in pastillage (another type of sugar paste) echoing the design and surrounded by the beautiful frangipani. The cake itself, a recipe dictated by our chef-instructor, was an orange pound cake filled with a Grand Marnier ganache and the thinnest layer of orange marmalade.

We were given three days to complete the cake start-to-finish, so a detailed and tightly planned itinerary was a must. Day 1 was a mad rush of cake mixing and baking, cutting layers, trimming edges, making buttercream, mixing the ganache (with plenty of Grand Marnier, of course), and filling the cakes. I also made my fondant for covering the cake and the pastillage sugar dough for the monogram.

Day 2 saw me crumb-coating the cakes, making the delicate sugarpaste frangipani, and attempting to cut out my design for the front of the cake. My usually trusty X-acto knife (an important weapon in the pastry chef's arsenal) proved stubbornly incapable of cutting the clean edges through rolled sugarpaste that my design demanded. When my paring knife failed almost as badly, I called on our chef for advice. His inspiration to make the design elements 3-dimensional produced a cleaner, bolder look than the cut-outs and eliminated the rough edges that had been fretting me. So I spent the last part of class frantically rolling out sugarpaste pieces and trying to give them the gentle curves and contours of the invitation's scrolls.

Day 3 was all about assembly and the final touches. When each layer, and a cardboard base, had been carefully covered in its blue fondant wrapping, wooden dowels cut exactly to measure were inserted through the center of each tier. These dowels, though barely 1/4" thick, are capable of supporting significant weight when properly distributed. I found myself holding my breath as I stacked the tiers on top of one another and gently secured the monogram and flowers to the top-most tier. It held, and I reached quickly for my camera.


The Level 2 students, who had set all of our cakes in motion, got to come up and vote for their favorite. As they walked around the room and examined each cake in turn, I was struck by the variety of designs and colors that my class had produced as each student filtered the requirements given them through the lens of personal taste and experience - we ran the gamut from pristine white cakes covered in tiny delicate flowers to bold, colorful cakes inspired by Gaudi's surreal Barcelona architecture.

My cake didn't win. It might not have gotten even one vote. But the experience of transforming a two-dimensional drawing into a (delicious!) three-dimensional cake was much more fun than I expected. I'd like to think that Katie and Dennis (our mythical couple) would have enjoyed the cake I made for them - I know the former co-workers that I brought it to certainly did!

mea culpa

I'm sorry, I know it's been forever and a day since I last posted.  I had good reason, I promise - a flurry of final projects and studying and exams was keeping me very very busy.  But it's all over now, and I am officially the proud possessor of a Grand Diplome in Classic Pastry Arts (with honors, no less!)  There were some ups and downs in the last few weeks, but overall it was a wonderful ride.  Keep an eye out for a series of posts with my final projects - there's some cool stuff!

Sunday, March 22, 2009

fry it, you'll like it

A well-rounded pastry chef is able to use a variety of ingredients and techniques to create delicious desserts. Roasting, baking, flambeing, freezing, bruleeing - we learn it all. Even deep-frying. My dad spent a number of his formative years in the South, where deep-frying has been elevated to an art form and is often mercilessly applied to any food in sight. I remember hunting in vain for a non-fried item of produce at one Sunday buffet with our relatives. The choices were pretty much Jell-O and iceberg lettuce. Despite living in the frigid north for over 30 years, my dad retains a weakness for some items of Southern cuisine that baffle me, like fried pig skins and boiled peanuts.

It took a day of deep-frying at a French school to awaken my latent fried-foods heritage and understand where my dad was coming from. And it was actually an Italian dessert that really did me in. Behold, the magnificent bomboloni!


I've actually mentioned bomboloni on this blog before. And those were good. But these were even better. I feel confident an equation could be written to demonstrate that the deliciousness of fried things is inversely proportional to the amount of time they've been out of the fryer. And these were as freshly fried as they could be.

Great frying is both a science and an art. On the science side, there are strict rules about temperature and time that must be obeyed. The best deep frying occurs when the oil is between 350 and 400 F. Cold oil won't cook things quickly enough and results in a soggy, greasy final product, while oil hotter than 425 F becomes toxic. Also important: never mix old and new oil, never pour cooking oil down the drain, and NEVER throw water on a grease fire. Our chef showed us a short, but effectively horrifying, video about the dangers of that last. I like my eyebrows and my face, so I'm all about safety when deep-frying.

Thus armed with important safety knowledge, we set about making our bomboloni. Even rounds of brioche dough, rolled smooth and left to proof on our workbench, were scooped up and (gently, to prevent potentially scarring hot oil spatters) deposited in the waiting oil. A soft plop, a quick hissing sizzle, and the brioche rounds bobbed merrily in our cast iron pan. After a few minutes, we nudged them to flip and reveal a golden underbelly. A few minutes more, and they were scooped from the hot oil, rolled in granulated sugar, and filled with pastry cream or raspberry jam. Plated desserts are all about presentation, so we carefully arranged a trio of bomboloni with the three corresponding sauces. A small scoop of ice cream and a crunchy tuile cookie added contrast in texture and temperature. The overall effect was knock-your-socks-off delicious. With a still-hot, crispy sugared exterior and rich, tender interior giving way to a creamy vanilla or chocolate filling, these Italian doughnuts have Dunkin' beat by a mile.

To round out our deep-frying education, we made tropical beignets and deep-fried crepes. Making the batter was fun: how many times have you gotten to crack open a bottle of beer at 9 am in the name of education? The batter was the most complicated part of the recipe, as it remained only to dip chunks of tropical fruit in the batter and send them the way of the bomboloni.


Pretty as the starfruit and mango looked, I didn't really like the way they tasted deep-fried. The tart flavors and firm texture were an odd juxtaposition with the bread-like batter. Banana beignets, however, I can recommend without reservation. They taste a little bit like my favorite banana pancakes, but more caramelized and yeasty. And they can be put on a stick, which any fan of State Fair cuisine knows is a real plus.

Our final deep-frying adventure was apple-filled crepes. They weren't bad, but the best thing about them was the hard cider ice cream we served alongside. Of course, by that point in the afternoon I smelled like I had been soaked in frying oil and was starting to feel slightly ill. Delicious as it is, I may not have inherited my Southern antecedents' tolerance for massive amounts of deep-fried food. For this Minnesota girl, deep-frying may be an adventure best reserved for special occasions. I'm thinking Thanksgiving, I'm thinking turkey...


Friday, March 20, 2009

books and cookies - enough said

It was snowing this morning, and this afternoon I saw yellow daffodils in Central Park. Seriously, what is up with this crazy weather? I have always been a dedicated four season-er, but I am about ready to throw away my winter coat and move to Hawaii. Luckily, last night was just fine, so I made it to my first ever book signing weather delay-free and even 20 minutes early. Which was good, because Idlewild Books, an independent and travel bookstore near Union Square, is not a big place, and Molly Wizenberg, author of the blog Orangette and the new book "A Homemade Life," is a very popular person. By the time the reading started, it was standing room only.

Orangette was one of the first food blogs I ever read, and it remains among my favorites. At the time I discovered it I was working many hours a day on a cavernous, fluorescent trading floor, sitting slumped in a swivel chair and staring at a screen. Reading Orangette, with its stories of real food handmade with love and care, was like entering a wish-fulfillment fantasy, the perfect antidote to three meals a day eaten at my desk. It also helped get me back in the kitchen - so many of Molly's recipes sounded too good to not make, and they all seemed reasonable for a novice cook to attempt on her free weekends. Some of these recipes I've since adopted as staples in my own repertoire: her oatmeal-chocolate chip cookies and banana bread with cinnamon sugar gained a loyal following among my coworkers, while the warm chickpea salad is my favorite easy supper.

So when I read that Molly would be coming to New York on her book tour, I knew that I would go. And I'm really glad I did. Not only do I now have my first-ever autographed book, which is sitting proudly on my bookshelf, I also enjoyed hearing Molly speak and read from her book. (Which is wonderful, by the way. Just carry Kleenex, especially if you're reading it in public. I inadvertently read a very sad chapter on the subway on the way to school, which led to me sniffing loudly and wiping tears from my eyes as I stumbled through the Broadway-Lafayette station. Not the best way to start a school day.)

Good writers have the ability to take a feeling or an idea and wrap it up in an accessible package, to put a name on the ineffable. And occasionally when you read or hear their take on something, you think "yes! that is what I meant to say, but I didn't know how." Molly did this beautifully last night when she said that food is a tangible way of getting at intangible things. I think she's absolutely right, and I think that's why cooking for ourselves and others can be so satisfying. Food isn't just about what tastes good. It's also about memory and family and emotion, about who we are and who we have been and who we want to be.

One of the questions Molly fielded last night was to name her top five recipes from the blog. She cited broccoli soup and cabbage with hot sauce, celeri remoulade and David Leite's chocolate chip cookies from the New York Times.

These are all good, but for my money, the best recipe on there is the one I've made the most - the oatmeal chocolate chip cookies. It was the first recipe I made when I got a KitchenAid stand mixer last spring, and I've been known to make a triple batch for special occasions. The dough can be refrigerated for up to three days or frozen for longer, and the cookies can even be frozen after baking - they're surprisingly chewy and delicious straight from the freezer, especially in hot weather. The link to her recipe is above, I'll add only that I usually make it with 1/2 whole wheat flour, chopped-up dark chocolate bars can be a great substitute for semisweet chips, and letting the dough rest in the refrigerator for a day or two, a la David Leite, can yield some pretty delicious results. Hope you enjoy!

p.s. If you're ever in the vicinity of Union Square, definitely stop by Idlewild - it's a great store, with an interesting selection of books and a unique cataloguing method- travel books and literature are all arranged by destination, i.e. France. So you can find Colette sharing shelf space with the Michelin guide to Paris, or The Quiet American near Lonely Planet Vietnam. As an added bonus, there's a great wine store across the street called Bottlerocket Wines. Bottlerocket is worth a visit for two reasons: 1) it's organized into user-friendly thematic displays, and all the wines and spirits have helpful blurbs and a store rating. 2) It's owned by a Williams alum, who hosted an alumni tasting at the store earlier this year. So you can find the perfect wine with ease and support another Eph - a win-win situation!

Tuesday, March 17, 2009

spring, and souffles!


"Souffle," according to various sources, is French for either "to blow up" or "to puff up." Culinary interpretations often seem to favor the latter. Me, I prefer the former, more explosive option. As we learned in class yesterday, a properly made souffle can get some serious vertical height. Check out the before and after photos of this strawberry souffle...


With yesterday's lesson, I finally conquered my fear of being pulling a Sabrina and producing souffles as flat as Audrey Hepburn's. (Though if I were really like Sabrina, I'd be in Paris, so I don't think I'd mind too much.) The ovens were on, and all of our souffles rose beautifully. In addition to the pretty pink strawberry ones above, we also made a dark chocolate, more cake-y version, and a bechamel-based souffle with spinach and a cheddar sauce.

Though all these souffles had different bases and flavorings, every souffle must be baked a la minute, or right before service. This is because the meringue that gets folded into the batter at the last minute can deflate before baking, and once baked all souffles have a tendency to collapse as the hot air inside cools down. The structure of the souffle isn't firm enough to support its newly acquired height, so it eventually caves in on itself. Moral of the story: eat your souffles fast!

Souffles aren't the only things popping up around here, which is how I know it's finally really truly spring. The vernal equinox isn't officially until Friday, but I saw my first flowers this past weekend so I'm counting spring as sprung. Tucked away in Central Park, some brave patches of snowdrops and crocuses are peeking through, vividly purple and white against the brown of woodchips and tree trunks. Of course, this being New York, almost all of the flowers had telephoto-wielding tourists clustered around them. Go in the middle of the week and maybe you can have them to yourself.

The weather hasn't quite come around to the idea of spring yet, but I've decided to take the tack of dressing for the weather I want, not the weather I have (isn't that what they say about jobs and how to succeed in the workplace?) My sandals got a few funny looks on the subway this morning, but my toes felt great. Here's hoping the sunshine catches up with us soon.

Sunday, March 15, 2009

snow day cookies

Walking outside in the sunshine yesterday, it's hard to believe that less than two weeks ago I was enjoying my first snow day in years! Growing up in Minnesota a snow day was a very rare treat. Minnesotans, hardy and accustomed to the worst winter weather, cancelled school only when it was too cold for schoolkids to wait outside for the bus. So I should have been delighted to get a snow day last Monday when New York was drowning under an unaccustomed March snowstorm. And I was happy to have a day off, I really was. But it's been an awfully long winter here in New York.

To make myself feel better about the prospect of wading through slush for the next week (snow in New York never STAYS snow, you see - it spends most of its life cycle as dirty slush, then dirty water) I made some oatmeal cookies, polished off a giant pile of homework, and watched at least eight hours of LOST, my new TV obsession.

These were not just any oatmeal cookies, mind you. They were the oatmeal cookies I'd been thinking about since our field trip to Baked. Crispy outside, chewy inside, they had just enough tart Montmorency cherries, creamy white chocolate, and toasted walnuts to make every bite interesting. These dried cherries, plump and tart, might be my favorite Costco purchase ever, a perfect example of how top-notch ingredients can elevate even a great recipe to the next level. The white chocolate, which I thought I remembered eating at the bakery, wasn't in the recipe from the cookbook, so I added it myself. (I made another batch this week to bring to tutoring, and tried semisweet chocolate - also very yummy.)

The cookies were delicious, and bringing a batch to share with my class the next day made me feel much better about wading through slushy streets to get there. They're good enough, in fact, to make any day feel like a day off - try a batch and see!

Oatmeal Cherry Nut Cookies (adapted from the Baked cookbook by Matt Lewis and Renato Poliafito)
1 1/2 c. all-purpose flour
1 tsp. baking soda
1 tsp. salt
2 tsp. cinnamon
1 tsp. nutmeg (freshly grated is best, but ground can also be used. You can use a Microplane/citrus zester to grate nutmeg easily, and the whole spice can be found at most grocery stores)
1/4 tsp. ground cardamom
1 c. unsalted butter, room temp.
1 1/4 c. dark brown sugar, firmly packed
1/4 c. granulated sugar
2 large eggs
1 tsp. vanilla
2 3/4 c. rolled oats
1 c. dried cherries
1/2 c. chopped toasted walnuts (350 F for 10-12 min. should toast nicely)
1/2 c. white chocolate chips

Combine flour, soda, salt, and spices in a large bowl and set aside
Cream butter and sugars with electric mixer on medium-high speed. Beat until smooth and butter lightens in color.
Scrape down the bowl and add the eggs one at a time. Add next egg only when previous is incorporated.
Add vanilla, beat 5 seconds.
Add half flour mixture, mix 15 seconds. Add remaining, beat just until incorporated.
Use spatula or wooden spoon to mix in oats, cherries, walnuts.

Cover and refrigerate at least two hours and up to three days.

Preheat oven to 375 degrees F. Prepare baking sheets with parchment paper or Silpat. Place rounded tbsp of dough on sheet. Bake 12-14 min, or just until cookies begin to brown, rotating after 6-7 min. Let cookies cool on pan for a few minutes, then move to wire rack to cool completely (if you leave them on the pan, the carryover heat will overbake them, and you will get crispy-crispy cookies instead of crispy-chewy cookies). Delicious hot or cooled!


sugar sugar

For the last week (since our Snow Day, in fact) my class has been playing around with sugar. Poured, pulled, blown, pressed, spread over denatured alcohol or doctored with royal icing and agitated until it souffles to twice its size - we've done it all. On Monday and Tuesday we got to pull it all together, working in groups to create showpieces utilizing the various techniques.

Monday's theme was "great art." Our group was working from a painting by a Brazilian artist from the early 20th century. Her bright color palette and bold, graphic design lent themselves well to translation in sugar. After a day of pulling, pouring, and blowing our sugar, we sweated through the very delicate process of assembling the completed pieces. There were a few minior mishaps - a broken cactus arm here, a crumbling rock there - but nothing some Isomalt (a "fake" sugar that melts more quickly and sets faster and harder than real sugar) and airbrushed food color couldn't fix. Here's the finished product - we were all pretty happy with the result!


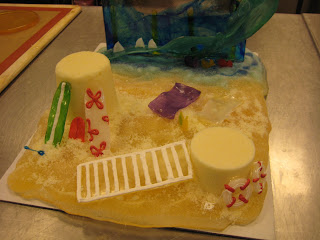
Tuesday's theme was "Spring." The classroom was full of beautiful pastel flowers and charming butterflies and vernal grasses. In our corner, however, we took a slightly different tack, adopting "spring break" as our focus. This showpiece was a little trickier to design and execute since Monday's, because it had to be beautiful AND functional. Our design was required to include two platforms that would support 6" cakes. Our supports were made out of pressed sugar, made almost like a sand castle, but with wet sugar instead of wet sand. This technique turned out to be a great choice, because we were able to use the leftovers to decorate the finished showpiece.


The focal point of the show piece was a beautiful pulled sugar wave, but the real genius of it was in all the charming details - the plane pulling the sign, the little shark fins poking out of the wave, the tiny life preservers, colorful pulled sugar surfboards, miniature beer bottles poking out of the "sand." We also got to try some fun new techniques - the base was made by pouring molten sugar onto a sheet pan filled with granulated sugar. This gave us a really cool crystallized surface, perfect for our "beach," and pouring natural and blue sugars next to each other gave a great depth effect for the "shoreline." Hopefully you can tell we had a lot of fun making this!