Sunday, March 22, 2009

fry it, you'll like it

A well-rounded pastry chef is able to use a variety of ingredients and techniques to create delicious desserts. Roasting, baking, flambeing, freezing, bruleeing - we learn it all. Even deep-frying. My dad spent a number of his formative years in the South, where deep-frying has been elevated to an art form and is often mercilessly applied to any food in sight. I remember hunting in vain for a non-fried item of produce at one Sunday buffet with our relatives. The choices were pretty much Jell-O and iceberg lettuce. Despite living in the frigid north for over 30 years, my dad retains a weakness for some items of Southern cuisine that baffle me, like fried pig skins and boiled peanuts.

It took a day of deep-frying at a French school to awaken my latent fried-foods heritage and understand where my dad was coming from. And it was actually an Italian dessert that really did me in. Behold, the magnificent bomboloni!


I've actually mentioned bomboloni on this blog before. And those were good. But these were even better. I feel confident an equation could be written to demonstrate that the deliciousness of fried things is inversely proportional to the amount of time they've been out of the fryer. And these were as freshly fried as they could be.

Great frying is both a science and an art. On the science side, there are strict rules about temperature and time that must be obeyed. The best deep frying occurs when the oil is between 350 and 400 F. Cold oil won't cook things quickly enough and results in a soggy, greasy final product, while oil hotter than 425 F becomes toxic. Also important: never mix old and new oil, never pour cooking oil down the drain, and NEVER throw water on a grease fire. Our chef showed us a short, but effectively horrifying, video about the dangers of that last. I like my eyebrows and my face, so I'm all about safety when deep-frying.

Thus armed with important safety knowledge, we set about making our bomboloni. Even rounds of brioche dough, rolled smooth and left to proof on our workbench, were scooped up and (gently, to prevent potentially scarring hot oil spatters) deposited in the waiting oil. A soft plop, a quick hissing sizzle, and the brioche rounds bobbed merrily in our cast iron pan. After a few minutes, we nudged them to flip and reveal a golden underbelly. A few minutes more, and they were scooped from the hot oil, rolled in granulated sugar, and filled with pastry cream or raspberry jam. Plated desserts are all about presentation, so we carefully arranged a trio of bomboloni with the three corresponding sauces. A small scoop of ice cream and a crunchy tuile cookie added contrast in texture and temperature. The overall effect was knock-your-socks-off delicious. With a still-hot, crispy sugared exterior and rich, tender interior giving way to a creamy vanilla or chocolate filling, these Italian doughnuts have Dunkin' beat by a mile.

To round out our deep-frying education, we made tropical beignets and deep-fried crepes. Making the batter was fun: how many times have you gotten to crack open a bottle of beer at 9 am in the name of education? The batter was the most complicated part of the recipe, as it remained only to dip chunks of tropical fruit in the batter and send them the way of the bomboloni.


Pretty as the starfruit and mango looked, I didn't really like the way they tasted deep-fried. The tart flavors and firm texture were an odd juxtaposition with the bread-like batter. Banana beignets, however, I can recommend without reservation. They taste a little bit like my favorite banana pancakes, but more caramelized and yeasty. And they can be put on a stick, which any fan of State Fair cuisine knows is a real plus.

Our final deep-frying adventure was apple-filled crepes. They weren't bad, but the best thing about them was the hard cider ice cream we served alongside. Of course, by that point in the afternoon I smelled like I had been soaked in frying oil and was starting to feel slightly ill. Delicious as it is, I may not have inherited my Southern antecedents' tolerance for massive amounts of deep-fried food. For this Minnesota girl, deep-frying may be an adventure best reserved for special occasions. I'm thinking Thanksgiving, I'm thinking turkey...


Friday, March 20, 2009

books and cookies - enough said

It was snowing this morning, and this afternoon I saw yellow daffodils in Central Park. Seriously, what is up with this crazy weather? I have always been a dedicated four season-er, but I am about ready to throw away my winter coat and move to Hawaii. Luckily, last night was just fine, so I made it to my first ever book signing weather delay-free and even 20 minutes early. Which was good, because Idlewild Books, an independent and travel bookstore near Union Square, is not a big place, and Molly Wizenberg, author of the blog Orangette and the new book "A Homemade Life," is a very popular person. By the time the reading started, it was standing room only.

Orangette was one of the first food blogs I ever read, and it remains among my favorites. At the time I discovered it I was working many hours a day on a cavernous, fluorescent trading floor, sitting slumped in a swivel chair and staring at a screen. Reading Orangette, with its stories of real food handmade with love and care, was like entering a wish-fulfillment fantasy, the perfect antidote to three meals a day eaten at my desk. It also helped get me back in the kitchen - so many of Molly's recipes sounded too good to not make, and they all seemed reasonable for a novice cook to attempt on her free weekends. Some of these recipes I've since adopted as staples in my own repertoire: her oatmeal-chocolate chip cookies and banana bread with cinnamon sugar gained a loyal following among my coworkers, while the warm chickpea salad is my favorite easy supper.

So when I read that Molly would be coming to New York on her book tour, I knew that I would go. And I'm really glad I did. Not only do I now have my first-ever autographed book, which is sitting proudly on my bookshelf, I also enjoyed hearing Molly speak and read from her book. (Which is wonderful, by the way. Just carry Kleenex, especially if you're reading it in public. I inadvertently read a very sad chapter on the subway on the way to school, which led to me sniffing loudly and wiping tears from my eyes as I stumbled through the Broadway-Lafayette station. Not the best way to start a school day.)

Good writers have the ability to take a feeling or an idea and wrap it up in an accessible package, to put a name on the ineffable. And occasionally when you read or hear their take on something, you think "yes! that is what I meant to say, but I didn't know how." Molly did this beautifully last night when she said that food is a tangible way of getting at intangible things. I think she's absolutely right, and I think that's why cooking for ourselves and others can be so satisfying. Food isn't just about what tastes good. It's also about memory and family and emotion, about who we are and who we have been and who we want to be.

One of the questions Molly fielded last night was to name her top five recipes from the blog. She cited broccoli soup and cabbage with hot sauce, celeri remoulade and David Leite's chocolate chip cookies from the New York Times.

These are all good, but for my money, the best recipe on there is the one I've made the most - the oatmeal chocolate chip cookies. It was the first recipe I made when I got a KitchenAid stand mixer last spring, and I've been known to make a triple batch for special occasions. The dough can be refrigerated for up to three days or frozen for longer, and the cookies can even be frozen after baking - they're surprisingly chewy and delicious straight from the freezer, especially in hot weather. The link to her recipe is above, I'll add only that I usually make it with 1/2 whole wheat flour, chopped-up dark chocolate bars can be a great substitute for semisweet chips, and letting the dough rest in the refrigerator for a day or two, a la David Leite, can yield some pretty delicious results. Hope you enjoy!

p.s. If you're ever in the vicinity of Union Square, definitely stop by Idlewild - it's a great store, with an interesting selection of books and a unique cataloguing method- travel books and literature are all arranged by destination, i.e. France. So you can find Colette sharing shelf space with the Michelin guide to Paris, or The Quiet American near Lonely Planet Vietnam. As an added bonus, there's a great wine store across the street called Bottlerocket Wines. Bottlerocket is worth a visit for two reasons: 1) it's organized into user-friendly thematic displays, and all the wines and spirits have helpful blurbs and a store rating. 2) It's owned by a Williams alum, who hosted an alumni tasting at the store earlier this year. So you can find the perfect wine with ease and support another Eph - a win-win situation!

Tuesday, March 17, 2009

spring, and souffles!


"Souffle," according to various sources, is French for either "to blow up" or "to puff up." Culinary interpretations often seem to favor the latter. Me, I prefer the former, more explosive option. As we learned in class yesterday, a properly made souffle can get some serious vertical height. Check out the before and after photos of this strawberry souffle...


With yesterday's lesson, I finally conquered my fear of being pulling a Sabrina and producing souffles as flat as Audrey Hepburn's. (Though if I were really like Sabrina, I'd be in Paris, so I don't think I'd mind too much.) The ovens were on, and all of our souffles rose beautifully. In addition to the pretty pink strawberry ones above, we also made a dark chocolate, more cake-y version, and a bechamel-based souffle with spinach and a cheddar sauce.

Though all these souffles had different bases and flavorings, every souffle must be baked a la minute, or right before service. This is because the meringue that gets folded into the batter at the last minute can deflate before baking, and once baked all souffles have a tendency to collapse as the hot air inside cools down. The structure of the souffle isn't firm enough to support its newly acquired height, so it eventually caves in on itself. Moral of the story: eat your souffles fast!

Souffles aren't the only things popping up around here, which is how I know it's finally really truly spring. The vernal equinox isn't officially until Friday, but I saw my first flowers this past weekend so I'm counting spring as sprung. Tucked away in Central Park, some brave patches of snowdrops and crocuses are peeking through, vividly purple and white against the brown of woodchips and tree trunks. Of course, this being New York, almost all of the flowers had telephoto-wielding tourists clustered around them. Go in the middle of the week and maybe you can have them to yourself.

The weather hasn't quite come around to the idea of spring yet, but I've decided to take the tack of dressing for the weather I want, not the weather I have (isn't that what they say about jobs and how to succeed in the workplace?) My sandals got a few funny looks on the subway this morning, but my toes felt great. Here's hoping the sunshine catches up with us soon.

Sunday, March 15, 2009

snow day cookies

Walking outside in the sunshine yesterday, it's hard to believe that less than two weeks ago I was enjoying my first snow day in years! Growing up in Minnesota a snow day was a very rare treat. Minnesotans, hardy and accustomed to the worst winter weather, cancelled school only when it was too cold for schoolkids to wait outside for the bus. So I should have been delighted to get a snow day last Monday when New York was drowning under an unaccustomed March snowstorm. And I was happy to have a day off, I really was. But it's been an awfully long winter here in New York.

To make myself feel better about the prospect of wading through slush for the next week (snow in New York never STAYS snow, you see - it spends most of its life cycle as dirty slush, then dirty water) I made some oatmeal cookies, polished off a giant pile of homework, and watched at least eight hours of LOST, my new TV obsession.

These were not just any oatmeal cookies, mind you. They were the oatmeal cookies I'd been thinking about since our field trip to Baked. Crispy outside, chewy inside, they had just enough tart Montmorency cherries, creamy white chocolate, and toasted walnuts to make every bite interesting. These dried cherries, plump and tart, might be my favorite Costco purchase ever, a perfect example of how top-notch ingredients can elevate even a great recipe to the next level. The white chocolate, which I thought I remembered eating at the bakery, wasn't in the recipe from the cookbook, so I added it myself. (I made another batch this week to bring to tutoring, and tried semisweet chocolate - also very yummy.)

The cookies were delicious, and bringing a batch to share with my class the next day made me feel much better about wading through slushy streets to get there. They're good enough, in fact, to make any day feel like a day off - try a batch and see!

Oatmeal Cherry Nut Cookies (adapted from the Baked cookbook by Matt Lewis and Renato Poliafito)
1 1/2 c. all-purpose flour
1 tsp. baking soda
1 tsp. salt
2 tsp. cinnamon
1 tsp. nutmeg (freshly grated is best, but ground can also be used. You can use a Microplane/citrus zester to grate nutmeg easily, and the whole spice can be found at most grocery stores)
1/4 tsp. ground cardamom
1 c. unsalted butter, room temp.
1 1/4 c. dark brown sugar, firmly packed
1/4 c. granulated sugar
2 large eggs
1 tsp. vanilla
2 3/4 c. rolled oats
1 c. dried cherries
1/2 c. chopped toasted walnuts (350 F for 10-12 min. should toast nicely)
1/2 c. white chocolate chips

Combine flour, soda, salt, and spices in a large bowl and set aside
Cream butter and sugars with electric mixer on medium-high speed. Beat until smooth and butter lightens in color.
Scrape down the bowl and add the eggs one at a time. Add next egg only when previous is incorporated.
Add vanilla, beat 5 seconds.
Add half flour mixture, mix 15 seconds. Add remaining, beat just until incorporated.
Use spatula or wooden spoon to mix in oats, cherries, walnuts.

Cover and refrigerate at least two hours and up to three days.

Preheat oven to 375 degrees F. Prepare baking sheets with parchment paper or Silpat. Place rounded tbsp of dough on sheet. Bake 12-14 min, or just until cookies begin to brown, rotating after 6-7 min. Let cookies cool on pan for a few minutes, then move to wire rack to cool completely (if you leave them on the pan, the carryover heat will overbake them, and you will get crispy-crispy cookies instead of crispy-chewy cookies). Delicious hot or cooled!


sugar sugar

For the last week (since our Snow Day, in fact) my class has been playing around with sugar. Poured, pulled, blown, pressed, spread over denatured alcohol or doctored with royal icing and agitated until it souffles to twice its size - we've done it all. On Monday and Tuesday we got to pull it all together, working in groups to create showpieces utilizing the various techniques.

Monday's theme was "great art." Our group was working from a painting by a Brazilian artist from the early 20th century. Her bright color palette and bold, graphic design lent themselves well to translation in sugar. After a day of pulling, pouring, and blowing our sugar, we sweated through the very delicate process of assembling the completed pieces. There were a few minior mishaps - a broken cactus arm here, a crumbling rock there - but nothing some Isomalt (a "fake" sugar that melts more quickly and sets faster and harder than real sugar) and airbrushed food color couldn't fix. Here's the finished product - we were all pretty happy with the result!


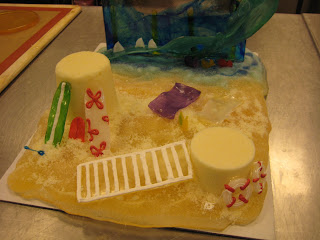
Tuesday's theme was "Spring." The classroom was full of beautiful pastel flowers and charming butterflies and vernal grasses. In our corner, however, we took a slightly different tack, adopting "spring break" as our focus. This showpiece was a little trickier to design and execute since Monday's, because it had to be beautiful AND functional. Our design was required to include two platforms that would support 6" cakes. Our supports were made out of pressed sugar, made almost like a sand castle, but with wet sugar instead of wet sand. This technique turned out to be a great choice, because we were able to use the leftovers to decorate the finished showpiece.


The focal point of the show piece was a beautiful pulled sugar wave, but the real genius of it was in all the charming details - the plane pulling the sign, the little shark fins poking out of the wave, the tiny life preservers, colorful pulled sugar surfboards, miniature beer bottles poking out of the "sand." We also got to try some fun new techniques - the base was made by pouring molten sugar onto a sheet pan filled with granulated sugar. This gave us a really cool crystallized surface, perfect for our "beach," and pouring natural and blue sugars next to each other gave a great depth effect for the "shoreline." Hopefully you can tell we had a lot of fun making this!


Monday, March 2, 2009

pick-me-up


Some desserts have names that make no sense - the mendiant (French for beggar) is a rich frozen mousse, mud pie is made of much better stuff than mud, and a milkshake is always stirred, not shaken. Tiramisu, however, is perfectly named. In translation it means "pick-me-up," which is exactly what this dessert can do. No matter how bad things get, it is almost impossible not to be cheered by the generous amounts of alcohol, caffeine, and deliciously rich mascarpone mousse in this Italian favorite.

My friend Brian is a tiramisu freak. When he found out I was going to pastry school, he insisted that when we made the dessert in class, he wanted to try the result. We made tiramisu in class last week, but to be honest, I didn't love it. So when I went over to Brian's to share the results of my tiramisu education, I made a few small changes, and was much happier with the final product.

Some of the changes were made out of necessity - Brian, despite cooking often and well, prides himself on owning a minimum of kitchen gadgets and being a culinary MacGyver, to the point of not even owning a set of measuring cups. I think it's a guy thing. So making the pate a bombe (eggs whipped with softball syrup) called for in the tiramisu recipe was out. I altered the recipe to make a sabayon-based mousse instead, which could be done without an electric mixer.

Sabayons are egg yolks whipped with sugar and alcohol over a double boiler. Heating and stirring this custard whips air into the mixture as the eggs stabilize, creating a voluminous foam that will be folded with whipped cream and mascarpone cheese to create the filling. The classic tiramisu recipe calls for marsala wine to be the alcohol whipped with the egg yolks. I substituted a mixture of dry white wine (a nice Chateau St. Michelle Riesling) and brandy for the marsala when I made it on my own, and liked the end result much better.

Assembling the tiramisu is a snap - the mascarpone mousse is layered with ladyfinger cookies that have been soaked in a tasty (and potent!) alcohol and citrus-spiked espresso syrup, and a light dusting of cocoa powder sprinkled over the top. We sampled some of the tiramisu that evening, and Brian pronounced my version excellent. I consider that a meaningful honor, coming from one who is a connoisseur of the art form. I was so touched I left him most of a pan in his fridge, so he should be a pretty happy guy. Tiramisu can taste just as good or even better on the second or third day after its made, as the flavors have a chance to mellow and meld.

I've posted my version of the recipe below - at school we made these in cute little individual rings, but for the home baker I've tripled it, which fits nicely in a 9x13" baking pan or glass dish, as seen above. Hope you get a chance to make it, and let me know if you have any questions!

Tiramisu (adapted from the French Culinary Institute)

6 egg yolks
150 grams sugar
150 mL marsala, or a mixture of dry white wine and brandy
3 sheets gelatin
360 mL heavy cream
360 gr mascarpone cheese
approx. 36 ladyfinger cookies
approx. 400 mL of soaking syrup - I used a combination of fresh-brewed coffee, espresso powder, rum, Cointreau, and orange juice. I think it tastes best when the coffee flavor really comes through, so don't be shy with the espresso powder
cocoa powder for dusting

Whip your heavy cream to soft peak stage and chill. Place your gelatin in ice-cold water to let it bloom (soften up). To make the sabayon, combine egg yolks, sugar, and alcohol in a heatproof bowl (stainless steel or glass work well)an and set over a pot of boiling water. Cook, whisking vigorously, until the mixture has volume and definition - when you scrape the bottom of the bowl you should be able to see metal before the mixture rushes back in, and your whisk should leave a trail behind it. At this point remove the mixture from the heat, take your gelatin out of its ice bath, and add it to your sabayon. Mix til gelatin dissolves then cool sabayon on the counter or over an ice bath. When it is no longer warm, you can fold it together with your mascarpone cheese and whipped cream.
To assemble the tiramisu, dip each ladyfinger in the soaking syrup briefly (enough to get some flavor, not so much that it falls apart) and place in the bottom of your dish. Spread a layer of mousse on top. Repeat. If you have a very tall container, you may put 3 or more layers in; my shallow baking dish only had room for two. When you've spread your last layer of mousse, dust the top lightly with cocoa powder, and refrigerate to chill/set. Tiramisu also freezes very well. Once it's set, the fun part begins - buon appetito!